


Google Workspace POP Settings are very important if we want to download emails on our local system. While most businesses today use IMAP or Google’s Sync tools for real-time collaboration, POP3 (Post Office Protocol) remains a vital tool for specific use cases. Whether you need a local offline backup of all your emails, have strictly limited cloud storage, or operate in an area with unstable internet, POP ensures your emails are downloaded safely to your device.
However, Google’s security standards have evolved. Simply typing in your password often isn’t enough anymore. In this guide, namastu.com walks you through the correct, secure way to set up Google Workspace on Microsoft Outlook using POP settings.
Steps for Google Workspace POP Settings on Microsoft Outlook
Step 1: Enable POP in Your Gmail Settings
Before opening Outlook, you must tell Google to allow POP connections. By default, this is often turned off.
-
Log in to your Google Workspace Gmail account in a web browser.
-
Click the Gear icon (Settings) > See all settings.
-
Go to the Forwarding and POP/IMAP tab.
-
Scroll to the POP Download section.
-
Select Enable POP for all mail (or just for mail arriving from now on).
-
Crucial Step: Under “When messages are accessed with POP,” choose what happens to the cloud copy.
-
Option A: Keep Gmail’s copy in the Inbox (Recommended if you want a backup in the cloud).
-
Option B: Delete Gmail’s copy (Recommended only if you want emails only on your computer).
-
-
Click Save Changes at the bottom.
Step 2: Security & App Passwords: For Google Workspace POP Settings
Google Workspace highly secures 3rd-party apps. You cannot use your standard login password if you have 2-Step Verification enabled (which you should).
-
Go to your Google Account settings (click your profile photo > Manage your Google Account).
-
Select Security on the left.
-
Under “Signing in to Google,” select 2-Step Verification (enable it if it’s off).
-
Once enabled, go back to Security and search for App Passwords.
-
Create a new App Password named “Outlook POP”.
-
Copy the 16-character code generated. You will use this code instead of your regular password in Outlook.
Step 3: Configure Outlook Manual Settings
Now, open Microsoft Outlook.
-
Go to File > Add Account.
-
Enter your email address and select “Advanced options”.
-
Check the “Let me set up my account manually” box, then click Connect.
-
Select POP from the list of account types.
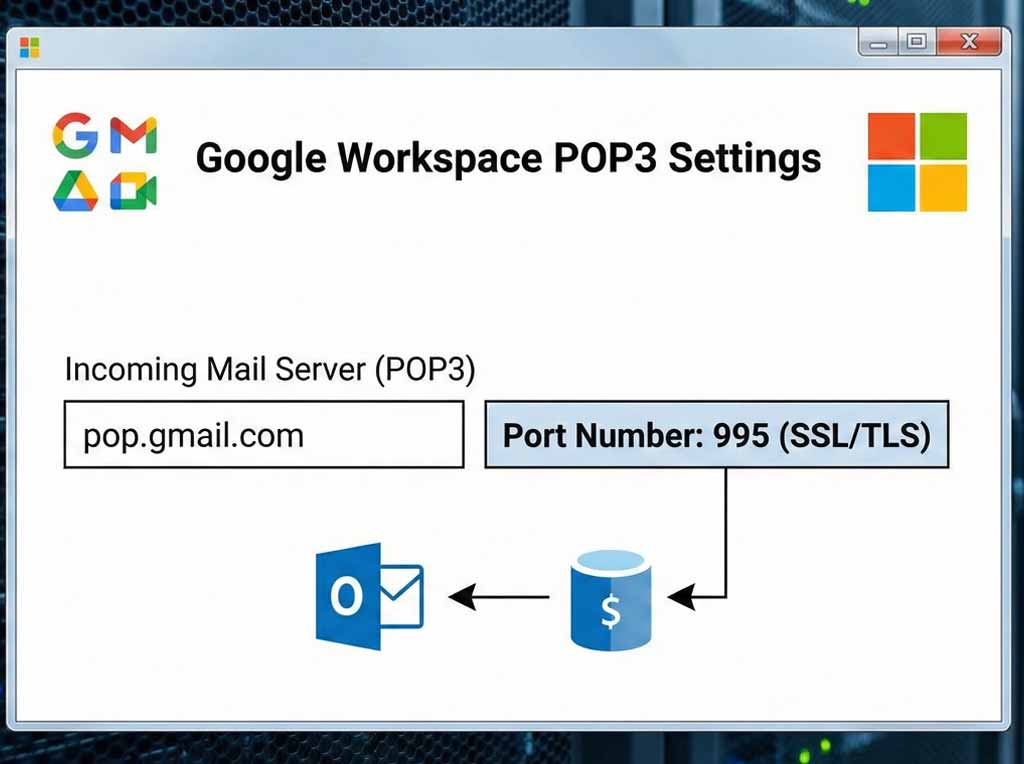
Enter the following Server Settings exactly:
Incoming Mail (POP):
-
Server:
pop.gmail.com -
Port:
995 -
Encryption method: Check “This server requires an encrypted connection (SSL/TLS)”
Outgoing Mail (SMTP):
-
Server:
smtp.gmail.com -
Port:
465 -
Encryption method: SSL/TLS
-
(Note: If 465 fails, try Port 587 with STARTTLS)
-
Click Next.
-
Password Field: Paste the 16-character App Password you generated in Step 2. Do not use your regular Gmail password.
-
Click Connect.
Step 4: Final Testing For Google Workspace POP Settings
Once Outlook says “Account successfully added,” click Done. Outlook will immediately begin downloading your emails.
A note on “Sent” items: unlike IMAP, POP does not sync your “Sent” folder. Emails you send from Outlook will be stored locally in Outlook’s Sent folder, but they may not appear in your Gmail web interface sent folder, depending on your specific SMTP configuration.
Is POP Right for Your Business?
POP is excellent for storage management but poor for multi-device users (e.g., using Outlook on PC and the Gmail App on mobile). If you need seamless syncing across all devices, check out our guide on IMAP or GSSMO configurations.
Need help deciding? At TARA TECHNOCRACY, we help businesses optimize their Google Workspace infrastructure for efficiency and security.
[Visit namastu.com for Expert Support]